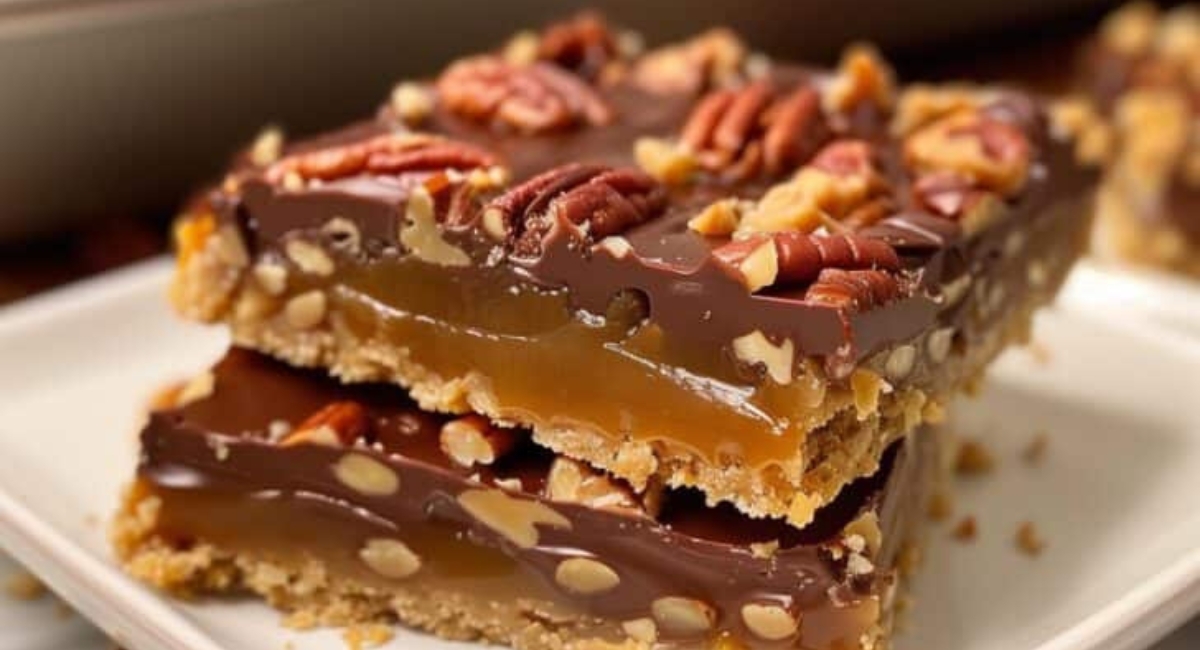
Christmas Turtle Bars
Descrição
Are you ready to create a festive dessert that will steal the spotlight at your holiday gatherings? Look no further than the delightful Christmas Turtle Bars! Layers of crumbly graham cracker crust, gooey caramel, and rich chocolate come together to create a mouthwatering treat that is both indulgent and irresistible. These bars are not just about taste; they carry a certain nostalgia with them, evoking memories of warm kitchens filled with the scents of sweet confections and laughter echoing around the family table.
Originating from the classic turtle candy – named for its resemblance to the animal with its pecan 'legs' and gooey caramel 'shell' – these bars offer a modern twist that is sure to impress your guests. Perfect for holiday parties, potlucks, or simply to enjoy with a cup of hot cocoa, the Christmas Turtle Bars not only look festive but also provide a rich, irresistible experience with every bite. The combination of textures—the crunch of pecans, the smoothness of the chocolate, and the softness of the caramel—creates a harmonious dessert that both children and adults will adore.
What makes this dessert truly special is how simple it is to prepare. You don’t need to be a seasoned baker to achieve a show-stopping result; with just a few straightforward steps, you can whip up these delectable bars. So, roll up your sleeves and let’s dive into this heavenly recipe!
Ingredientes
- For the crust:
- 1 ½ cups graham cracker crumbs
- ½ cup unsalted butter, melted
- ⅓ cup brown sugar
- 1 cup chopped pecans (plus extra for topping)
- For the caramel layer:
- 1 cup chewy caramel candies (approximately 14-15 pieces)
- 2 tablespoons heavy cream
- For the chocolate layer:
- 1 cup semi-sweet chocolate chips
- 2 tablespoons butter
Modo de Preparo
To begin crafting your divine Christmas Turtle Bars, preheat your oven to 350°F (175°C). This step is essential for the baking process, ensuring your crust achieves the perfect texture. While the oven is warming up, take a 9x13-inch baking dish and grease it lightly or line it with parchment paper. Lining it with parchment paper will allow for easier removal of the bars when they are fully set, so it’s a helpful little trick to keep in mind.
Now, let’s make the crust. In a large mixing bowl, combine the graham cracker crumbs, melted butter, brown sugar, and chopped pecans. The melted butter should coat the crumbs and sugar evenly, producing a mixture that holds together when pressed. Once combined, press this mixture evenly into the bottom of your prepared baking dish. Make sure to use a firm hand, as you want the crust to be compact and ready to support the luscious layers to come.
Bake the crust in the preheated oven for approximately 10 minutes. Keep an eye on it; you’re looking for a light golden-brown hue. This step is crucial, as it pre-bakes the crust to support the caramel and chocolate layers that will be added afterward.
After the crust has emerged, golden and fragrant, allow it to cool slightly. In the meantime, let’s prepare the caramel layer. In a small saucepan, combine the chewy caramel candies and heavy cream. Place the saucepan over low heat and stir continually. This gentle heating will help melt the caramels without burning them, creating a smooth, luscious mixture that will drizzle perfectly over your crust. The goal here is to achieve a silky smooth texture, so take your time and stir until there are no lumps left.
Once your caramel is velvety and melted, pour it over the crust, spreading it evenly to cover every inch. For an extra touch of festive flair, sprinkle some additional chopped pecans on top of the caramel layer. They’ll add not only decoration but also that satisfying crunch that complements the soft caramel beautifully.
Now, let's move on to the chocolate layer. In another saucepan, melt the semi-sweet chocolate chips and butter together over low heat. Stir continuously until the mixture is smooth and glossy. The butter will help create a beautiful shine and smooth texture for the chocolate, making it easy to spread over the caramel layer. Once melted, carefully pour this delightful chocolate mixture over the caramel, spreading it to ensure even coverage. At this point, your bars are shaping up to be a masterpiece!
After layering the chocolate, it’s important to let the bars cool to room temperature. This will help everything settle nicely and meld the flavors together. For the final touch, cover the dish and place it in the refrigerator to chill for at least 2 hours. You want the chocolate to set properly, allowing you to cut the bars into neat, perfect squares without compromising the layers.
Once the time is up, remove the dish from the fridge, and it’s showtime! Gently lift the bars from the dish using the parchment paper (if you used it) or a sharp knife to help separate the edges if you didn’t. Slice into bars of your desired size, and enjoy the delightful contrast between the crunchy crust, gooey caramel, and rich chocolate.
Dicas e Conclusão
For added flair, consider drizzling additional melted chocolate over the bars once they’re cut, or you could even sprinkle some sea salt on top for a delightful contrast to the sweetness. If you’re looking to switch things up, feel free to substitute the pecans with walnuts or even almonds for a different nutty flavor twist.
These bars can be stored in an airtight container in the refrigerator for up to one week, making them perfect for pre-holiday baking or for surprising guests at last-minute gatherings. You can even freeze them for up to three months! Just ensure you wrap them tightly to maintain freshness.
As you savor your freshly made Christmas Turtle Bars, take a moment to reflect on the joy of creating a dessert that brings people together. These bars are more than just a sweet treat; they're a delightful experience you can share with family and friends, making upcoming holiday gatherings even more special.
If you’re inspired to continue your festive baking spree, consider exploring some of our other delicious recipes like delectable peppermint brownies or spiced gingerbread cookies. Embrace the magic of the season with culinary creations that warm your heart and delight your taste buds! Don’t forget to share this Christmas Turtle Bars recipe with fellow bakers and keep exploring the site for more tasty ideas. Happy baking!